Of Mirrors and Mirrorless Cameras Part 1

Or, how I switched from a DSLR to a mirrorless Nikon Z7 and never looked back…

Some time ago I switched from my venerable Nikon D850 DSLR to a Nikon Z7 mirrorless camera. The Z7 has been an absolute joy to use and I’ve not looked back since.

There are already several articles written comparing DSLRs to mirrorless cameras. Here are my own thoughts on the subject, from the perspective of shooting for cosplay and portrait photography.

What does “Mirrorless” mean?

My poorly drawn diagram comparing autofocus for DSLRs vs Mirrorless cameras

To explain what the mirror in DSLRs does we can examine its inception in SLR (Single Lens Reflex) film cameras. One of the main advantages of SLR cameras over other models such as rangefinders is that the SLR’s optical viewfinder shows exactly what will be captured on film, whereas the viewfinder in non-SLR cameras often has parallax error. The SLR camera achieves this wizardry through a clever system of mirrors and prisms:

  1. Light from the scene enters the camera through the lens.
  2. The light then gets reflected by a mirror into the optical viewfinder.
  3. When the shutter is pressed the mirror rises to allow light to fall on the film.

This same mechanism is inherited by their digital successors the DSLRs, with film replaced by a digital sensor.

A mirrorless camera on the other hand does not use a mirror or an optical viewfinder at all. Instead light from the lens falls directly onto the main sensor, and the scene is captured and displayed through an electronic viewfinder.

Isn’t this the same as Live View mode?

Conceptually yes. Live View mode on a DSLR works in a similar way: the mirror stays raised and lets light fall onto the main sensor. Then just like in a mirrorless camera, the scene is displayed through the LCD panel on the back of the camera.

However a mirrorless camera has several notable advantages over a DSLR in Live View mode:

  • The mirrorless sensor contains its own autofocus points, which makes autofocus considerably faster than using a DSLR’s Live View mode
  • A mirrorless camera has a shorter flange focal distance (the distance between the sensor and the lens mount; more details on Wikipedia) as it does not need to accommodate a mirror. This allows a wider range of lenses to be adapted to the camera. (I’ll elaborate more on that in a subsequent post.)

Advantages of Autofocus (AF) in Mirrorless Cameras

Better Autofocus Accuracy

By far the biggest advantage of mirrorless cameras for me is improved accuracy in autofocus. With DSLRs autofocus is handled by a sensor that is separate from the main sensor. While the DSLR’s mirror reflects most of the light into the optical viewfinder, a portion of light is allowed to pass through into the autofocus sensor.

However for the autofocus sensor to work accurately, it must be perfectly calibrated and aligned with the main sensor. Differences in manufacturing and lenses may result in inaccuracies. For example I’ve found that on my DSLR, my Sigma Art 50mm f/1.4 lens misses focus a lot more often compared to other lenses; I’ve often had to work around this by switching to Live View instead in order to bypass the autofocus sensor.

To account for such inaccuracies, newer DSLRs have an AF Fine Tune feature that lets the user manually adjust the autofocus for each lens. However I’ve found this to be a painstakingly laborious process: each lens must be manually tuned, and the results seem to be a compromise at best: after AF Fine Tuning a lens may perform better at certain distances but worse at others 😓.

Modern mirrorless cameras avoid this hassle by having the main sensor handle autofocus directly. Newer mirrorless cameras have phase-detect AF points built directly into the main sensor, which makes autofocus speed comparable to that of a DSLR. Since there is no mirror and no separate AF sensor, there are fewer pieces that could introduce error. With the Z7 mirrorless, the same Sigma Art 50mm f/1.4 lens focuses just as well as my other lenses.

Off-center Autofocus Points are More Accurate

There are two common approaches to focusing:

  1. Focus-and-recompose
  2. Moving the focus point

Both are great approaches, but for portrait photography I prefer the latter because I want to move the camera as little as possible after acquiring focus. The subject may be composed far from the center of the frame, and for portraits I often use wider apertures to get shallower depth-of-field so recomposing could cause the eyes to be slightly out-of-focus as well.

With DSLRs the off-center AF points are usually less accurate than the one in the center. This is especially true when I used it with my Sigma Art 50mm f/1.4. With the Z7 I have had considerably more success getting accurate focus with all of the AF points, regardless of which lens I use.

Wider Spread of Autofocus Points

Comparison of how far the rightmost AF point is on the Nikon Z7 vs the Nikon D850

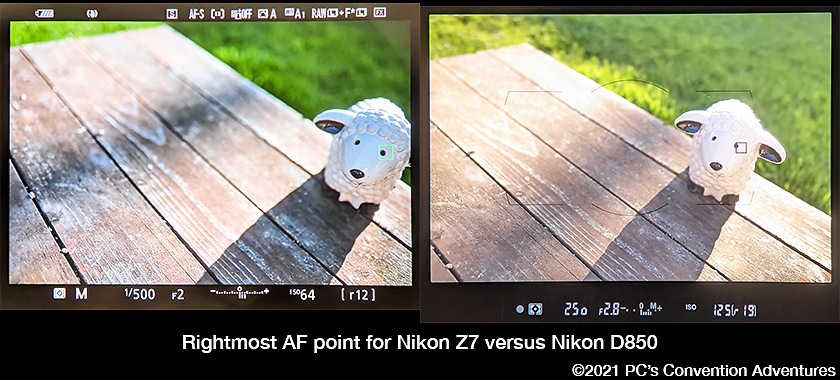
With DSLRs the AF points are typically clustered around the center. The furthest AF point barely comes close to the edge of the frame. This means I often still have to recompose slightly if my subject is near the edge of the frame.

With mirrorless the AF points cover almost the entire frame. This lets me compose first, then select the AF point closest to the subject to minimize camera movement.

No Focus Shift (well, almost…)

A DSLR typically focuses “wide-open”. For example if I were shooting at f/4.0 with a f/1.8 lens, the DSLR will focus at the widest possible aperture first (f/1.8 in this example). When the shutter is pressed, the lens is then stopped down to the desired aperture (f/4.0 in this example).

Focusing wide-open allows the camera to make use of the most light available for autofocus. However that leads to a different problem: focus shift – the lens’ focus may shift slightly as it stops down from its widest aperture. This is typically not a significant problem for most lenses, especially when focusing at the center, but it is a bigger problem when focusing with off-center focal points.

With mirrorless (and Live View) the lens focuses at the desired aperture instead (but only up to a point: the Z7 would stop down to no narrower than f/5.6 for focusing). Going back to our previous example, this means the lens focuses at the desired aperture of f/4.0. There is no change in aperture when the shutter is pressed, so focus shift does not occur. The viewfinder’s display is more representative of the bokeh as well.

To be cont’d…

Wow this has turned out to be a much lengthier post than I intended. I’ll continue the rest in a subsequent post.

In the meantime please feel free to let me know your thoughts with a comment below? Or reach out to me on Instagram at pcs_convention_adventures!

Cosplay Photography Part 1: An Introduction

What is Cosplay Photography? What makes it unique? First of what I hope will be a series of articles that cosplayers and photographers might find helpful.

Arisa Chan (小莎) as Zetton from Kaijuu Girls! Taken at Winter Comiket 2017 in Tokyo. An example of a hall shot with fashion-style post-processing. Photo credit: PC’s Convention Adventures

Introduction

Hi! If you enjoy anime or comics you’ve probably heard of or been to a convention. You might have marveled at your favorite characters brought-to-life by talented cosplayers in vibrant cosplays. That’s how I felt when I first attended Fanime almost 10 years ago, awestruck and feverishly taking snapshots of everything in sight. Eventually this led me to pursue cosplay photography as a hobby, which continues to be an enriching experience for me. I hope newcomers will find it rewarding as well!

Hall shot taken at Anime Expo by takaii
Anime Expo 2016! I missed it so I have to live vicariously through takaii’s photos. Photo credit: takaii

The Internet already has many excellent photography guides available, but I think cosplay photography is unique enough to warrant its own discussion. I hope both cosplayers and photographers will find this interesting!

Cosplay Photography Styles

Just as there are many genres of photography, such as fashion, lifestyle, journalism and more, there are many styles in cosplay photography as well. Many photographers and cosplayers draw inspiration from other genres such as fashion in order to develop their own unique approaches.

To give a sense of the wide variety of styles, here are some examples of a few broad categories:

Hall shots

luffyxiiiii as Ikki Kurogane from Chivalry of the Failed Knight.  Photo credit: crazydark1
luffyxiiiii as Ikki Kurogane from Chivalry of the Failed Knight. Photo credit: crazydark1

The humble hall shot is how many cosplay photographers get started: the photographer comes across someone in a cool cosplay and asks for a quick snapshot. There’s little planning ahead of time. The resulting photos are often fun, spontaneous and reflect the excitement of the event.

Getting a good hall shot can be quite difficult! Convention halls are typically lit with dim fluorescent lights; these typically have a greenish hue that can create an unhealthy-looking cast on skin tones. Hall lighting is often directly overhead which creates unflattering shadows as well. Also the photographer only has mere seconds to get the camera settings right. But I think the spontaneity and urgency are what make hall shots particularly challenging and fun.

Event coverage

Overwatch cosplay gathering at Anime Expo taken by takii
All the D.Vas and MEKAs! Overwatch cosplay gathering at Anime Expo 2016. Photo credit: takaii

Event coverage photos are closely-related to hall shots but more akin to photo-journalism. Their emphasis is on capturing the event rather than a specific cosplayer, and give a sense of what it’s like to be there. For example the photo above captures the colorful chaos of an Overwatch cosplay gathering. Another photo might show cosplayers performing on stage for an event such as the Masquerade. Cosplayers don’t have to be in-character either; the photo could simply be about people enjoying the event.

Fashion/portrait

mocchisama cosplaying as Tharja from Fire Emblem: Awakening
mocchisama as Tharja from Fire Emblem: Awakening! The skull is something I saved from Halloween. ^_^ Photo credit: PC’s Convention Adventures

Glossy. Punchy. This is the look we associate with fashion magazines. In portrait shoots the emphasis is squarely on the cosplayer: to capture them as the character in the most flattering way. Unlike hall shots or event coverage these shoots may require more preparation and planning, sometimes up to several months in advance. The photographer may scout and research a location to match the source material’s setting. Additional props might have to be added to embellish the set. To maintain suspension-of-disbelief the photographer has to carefully avoid out-of-place elements such as cars and passers-by, or remove them in post-production.

Speaking of post-production, this style often involves a fair amount of post-processing. Despite the considerable advancement in camera technology, most unedited straight-out-of-the-camera shots will not look quite the way we want. Depending on the photographer and cosplayer, the amount of post-processing varies. Some prefer simple edits, such as tweaking overall exposure and cropping the photo. Others may do more labor-intensive changes, like beauty retouching and special-effects. Post-processing can take anywhere from ten minutes to several hours for a single photo, all for the sake of creating the perfect image.

Narrative/Cinematic

akicchi_ in a snowscape taken by meatballz1986
akicchi in a winter fashion shoot. It’s so elegant! Photo credit: meatballz1986

This is a very emotive style where the emphasis is on the scene or narrative rather than the person. Like fashion/portrait shoots a significant amount of pre- and post-production work may be required. However the focus is more on the mood of the overall scene. In this style the cosplayer may be in their own world and does not make eye-contact with the camera. They may take up less space on the image but nevertheless play a key role in the composition. Narrative-style photos may also form a chronological sequence to tell a story, like a storyboard for a film. These photos feel like still frames from a movie.

Closing thoughts

This is by no means an exhaustive list. These examples are just to illustrate the many creative directions one could take in cosplay photography. It’s not a strict taxonomy either: photographers often use different styles for the same photoshoot. They may also try out different approaches to expand their repertoire.

Cosplayers, photographers, which styles resonate with you the most? Do let me know and add a comment below?

Much thanks to everyone who helped proofread this; your feedback and encouragement were invaluable.
All photos are owned by their respective owners and used with permission. All Rights Reserved. Please do not use the images without permission.

Cosplay Photography Etiquette

A guide for both photographers and cosplayers

Hi everyone! This is a short comic I drew back in 2019 to help spread awareness of do’s and don’ts for convention photography. My hope is that this will be helpful for photographers starting out in cosplay photography, and that it will also help newer cosplayers identify red flags in problematic photographers as well.

I had quite a lot of fun creating this; I hope it’s been an informative and fun read for y’all as well!

Some fun facts: I used to practice figure-drawing before picking up photography. The reason I used stick figures is two-fold: one is to avoid stereotypes for Good and Bad Photogs. With nondescript stick figures I can try to avoid associating “good” or “bad” with any particular demographic. This also keeps the focus squarely on the characters’ words and behaviors, rather than how they look.

The other reason is, well, I never really learnt how to draw faces and hands…… 😅

Many of the ideas (including the idea to make a comic) came from my cosplayer friends; thanks for your help and for proofreading this!

All Rights Reserved. Please do not use the images without permission.